As you may remember from my post last week, Salesforce to Salesforce How-to Part 1: Beyond the Basics, we were recently working with a set of clients who were working together to conduct a workforce training program. One organization, Screening Pittsburgh (SP), was focused on recruiting and screening candidates for the training program, and the other organization, Training Pittsburgh (TP), was responsible for ensuring that all screened candidates met the eligibility requirements and for conducting the training itself. We configured Salesforce to Salesforce for SP and TP so that they were able to share data about their training candidates (tracked in the Leads object), training students (tracked in the Contacts object), as well as the Leads’ career history (tracked in a custom object Careers) and program assessments (tracked in a custom object Screenings). In my Part 1 post, I shared the process we used to ensure that custom object records (i.e., Careers and Screenings) would retain their relationship to an associated Lead when they were shared via Salesforce to Salesforce.
This solution worked for us, but we found another problem: we realized that our custom object record types weren’t being retained during external sharing; for example, SP would create a “Drug Test” record type Screening record, and it would be displayed in TP’s system as an “Initial Contact” record type Screening record (note: “Initial Contact” was their default record type for this object). Here are the steps we took to resolve this issue, to ensure that the record types of incoming records were correct. We conducted all of the following steps in both instances of Salesforce (i.e., SP and TP) so that data could be shared in both directions:
1. We created two fields each on Career and Screening: Record Type In and Record Type Out. Both were text fields.

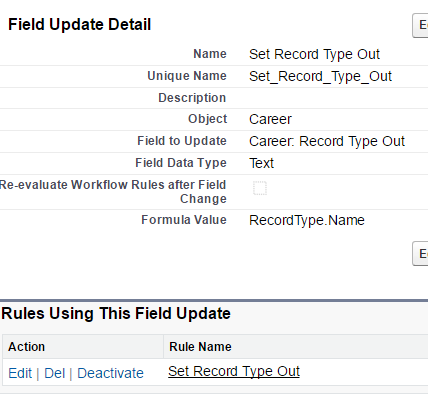
2. We created a workflow rule field update for each object (Career and Screening) to set the Record Type Out field with the Name of the actual Record Type of the record.

3. After confirming that the record types of our objects were listed in the exact same way in both instances of Salesforce, we used Salesforce to Salesforce to map the Record Type Out fields to the Record Type In fields.
This blog isn’t intended to go into the details of how to configure Salesforce to Salesforce. I recommend the introductory Salesforce to Salesforce documentation to learn the basics. If you have your basic Salesforce to Salesforce configuration down, the following image will make more sense. This shows the Connections screen where we subscribed on the SP side to fields published from the TP. As you can see, we specified which of the SP fields to populate with information from the TP fields.

4. Finally, we created a set of Process Builders to update the record type for each Career/Screening. Specifically, the Process Builder checked whether the Record Type In field was set or the Record Type name was set and the record wasn’t shared. Each step of the Process Builder looked for a different Record Type name, so there were as many steps as record types. Finally, the Process Builder set the correct Record Type ID. The images below show the Process Builders in more detail; we had as many steps in the Process Builder as there were record types for that custom object, and each step was the same: a) check whether the Record Type In value matches the name of a record type, and b) set the record type based on the Record Type ID. The second image shows an actual example of our Update Records action.


Ultimately, these solutions worked for us! Our clients have a functioning Salesforce to Salesforce system -- and are in the process of using that data management system to more efficiently train people for better careers. However, we’d love to hear if you have found a more elegant (or faster!) way to resolve these Salesforce to Salesforce issues! Please reach out to us at support@winnets.com with your Salesforce to Salesforce comments and ideas.